2022-10-31
Node Typescript 프로젝트에서 테스트 코드 작성을 위해 Jest를 적용한 것을 기록으로 남깁니다.
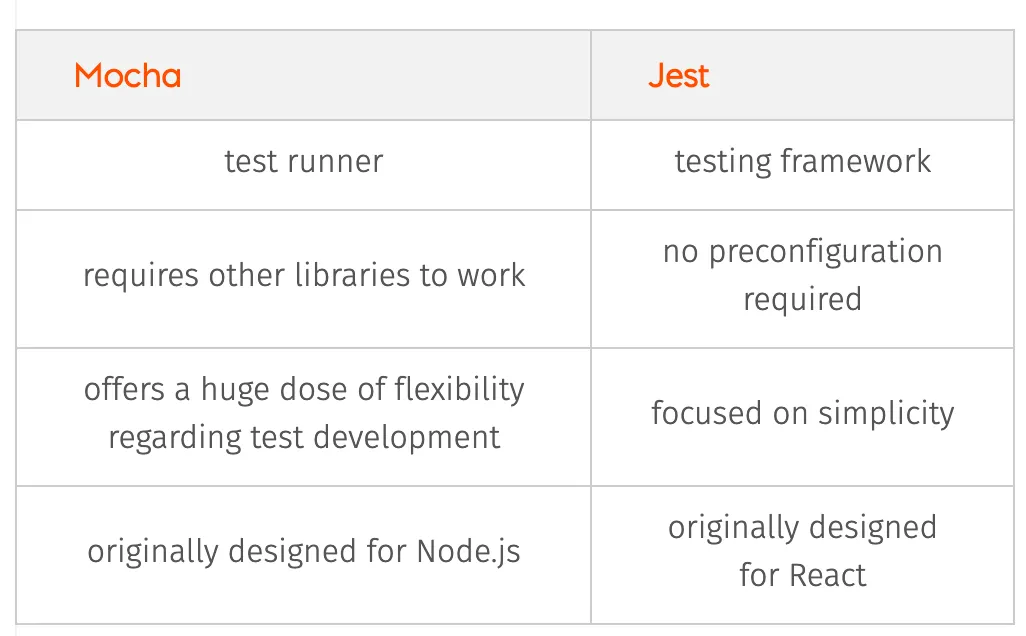
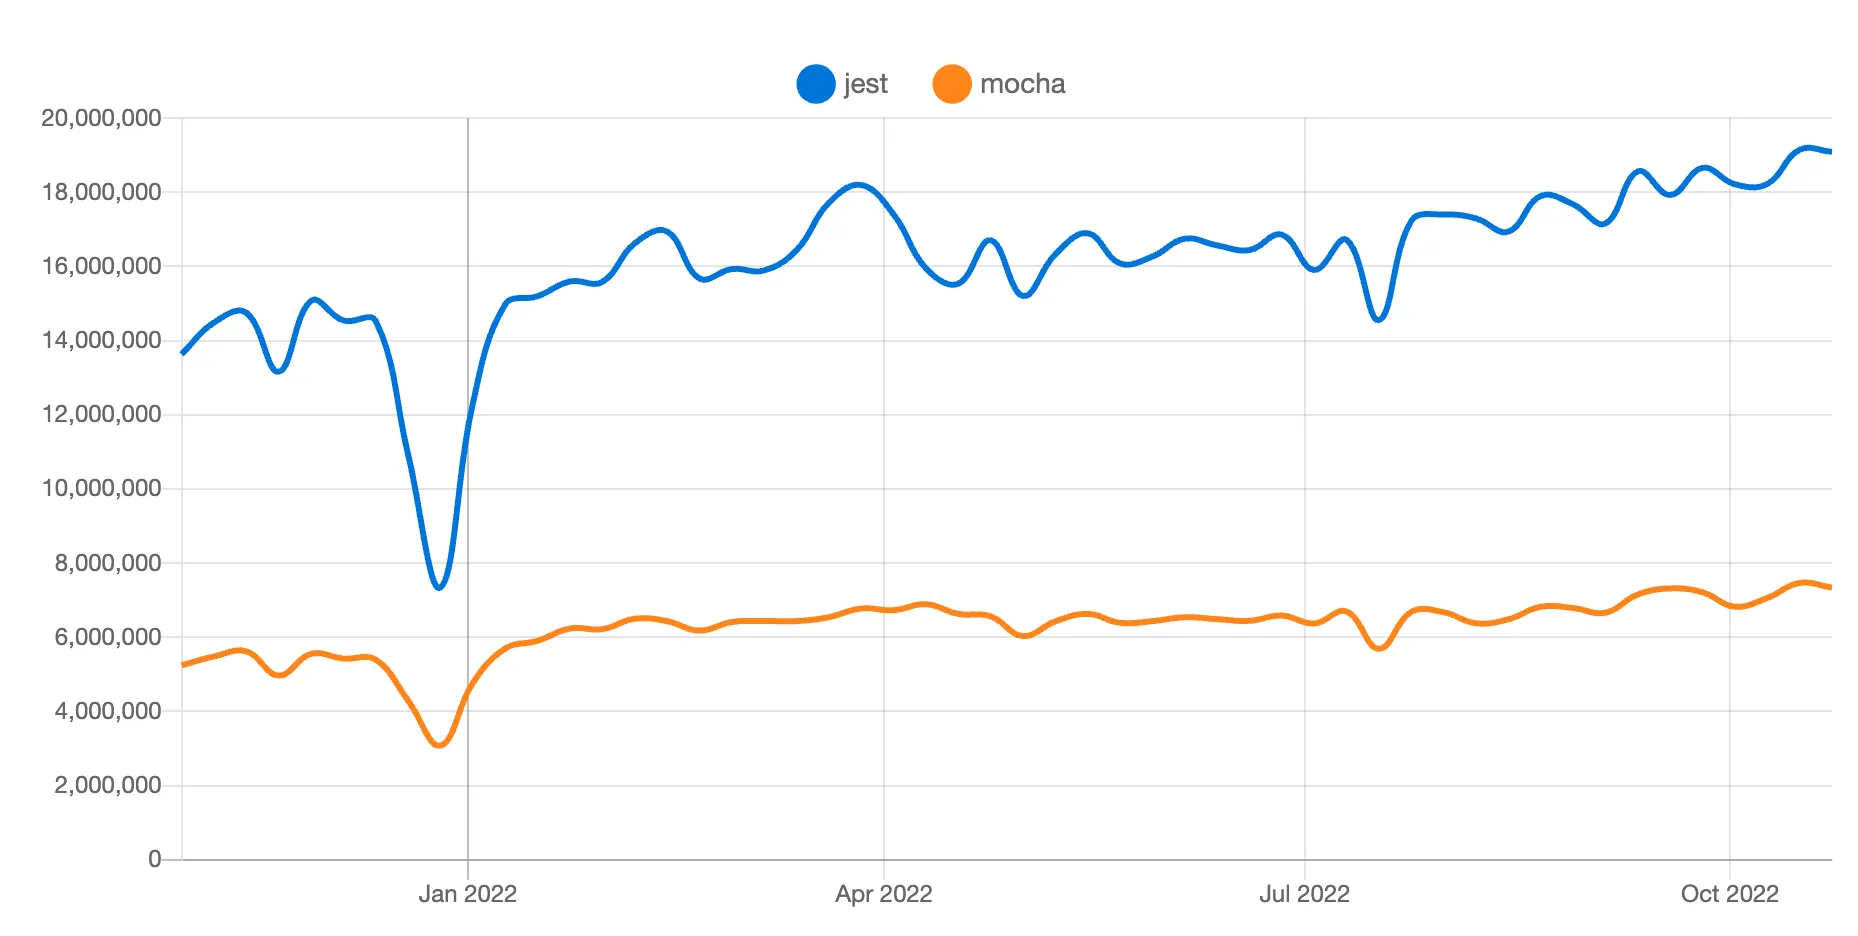
Jest를 사용하는 것이 설정이 편리하고 (mocha는 mocking을 위해서 sinon을 따로 사용해야 합니다) 테스트 코드 작성에만 집중할 수 있었습니다. 그리고 npm trend를 비교해보았을 때도 Jest의 사용량이 점점 더 증가하는 추세이기 때문에 Jest를 선택하였습니다.
Jest 설치하기
패키지 매니저로 jest를 설치합니다. 테스트이므로 개발 환경으로 설치합니다 (--dev)
yarn add --dev jest
# npm에서는
npm install --save-dev jest
Bash
복사
Babel 설치하기
Jest는 Babel을 통해서 Typescript를 지원하기 때문에 Babel을 설치해야 합니다.
Babel과 babel-jest, babel typescript 등을 설치합니다.
yarn add --dev babel-jest @babel/core @babel/preset-env @babel/preset-typescript
# npm에서는
npm install --save-dev babel-jest @babel/core @babel/preset-env @babel/preset-typescript
Bash
복사
프로젝트의 루트 경로에 babel.config.js 파일을 만들고 다음과 같이 설정합니다.
# babel.config.js
module.exports = {
presets: [
['@babel/preset-env', {targets: {node: 'current'}}],
'@babel/preset-typescript',
],
};
Bash
복사
Babel을 Typescript와 함께 사용하는 경우 놓치는 부분이 있습니다. Babel은 Typescript를 Javascript로 트랜스파일링만 시켜주는 것이기 때문에 Jest는 타입 체킹을 하지 못합니다.
타입 체킹을 하고 싶은 경우, ts-jest를 사용하거나 TypeScript Compiler (TSC)를 분리해서 실행해야 합니다.
 순수 Jest로 타입 체킹하기
Jest global API를 사용해서 2가지 방법으로 타입 체킹을 할 수 있습니다.
1.
@jest/globals 을 import하는 방식
import {describe, expect, test} from '@jest/globals'; // ⭐️ 이 부분을 import해서 타입 체킹을 합니다
import {sum} from './sum';
describe('sum module', () => {
test('adds 1 + 2 to equal 3', () => {
expect(sum(1, 2)).toBe(3);
});
});
TypeScript
복사
2.
@types/jest 패키지를 설치하는 방식 (제가 사용한 방식)
@types/jest 를 사용하면 @jest/globals 을 import 하지 않아도 됩니다.
다음과 같이 작성하여도 타입 체킹이 됩니다.
import {sum} from './sum';
describe('sum module', () => {
test('adds 1 + 2 to equal 3', () => {
expect(sum(1, 2)).toBe(3);
});
});
Bash
복사
다음과 같이 설치합니다.
yarn add --dev @types/jest
### npm에서는
npm install --save-dev @types/jest
Bash
복사
저는 ts-jest는 사용하지 않았고, @types/jest 패키지를 설치하여 타입 체킹을 하였습니다.
ts-jest 사용하기
ts-jest는 Jest를 위한 소스 맵을 지원하는 TypeScript 전처리기 입니다. Jest를 사용하여 TypeScript로 작성된 프로젝트를 테스트할 수 있습니다.
다음과 같이 설치합니다.
yarn add --dev ts-jest @types/jest
### npm
npm install --save-dev ts-jest @types/jest
Bash
복사
Jest를 사용하여 테스트 해보기
1.
package.json의 scripts 부분에 test를 추가합니다.
jest 명령어로 바로 테스트를 실행도 가능하지만 보통은 script를 통해서 실행을 시킵니다. 추가적인 옵션 설정을 하는 경우 등 협업에서 동일한 테스트를 가져가기 위한 편의성 때문입니다.
// package.json
"scripts": {
"test": "jest",
}
JSON
복사
2.
jest.config.js 설정하기
저는 다음과 같이 설정하였습니다. 필요에 따라서 설정하시면 됩니다.
testMatch 옵션에 따라서 파일명에 .test. 가 포함된 파일이 테스트되고, __tests__ 폴더 하위에 있는 파일이 테스트 됩니다. 그리고 tests/unit 파일의 .spec. 이 포함된 파일도 테스트 됩니다.
// jest.config.js
/*
* For a detailed explanation regarding each configuration property, visit:
* https://jestjs.io/docs/configuration
*/
module.exports = {
// Automatically clear mock calls, instances, contexts and results before every test
clearMocks: true,
// Indicates whether the coverage information should be collected while executing the test
collectCoverage: false,
// The directory where Jest should output its coverage files
coverageDirectory: 'coverage',
// Indicates which provider should be used to instrument code for coverage
coverageProvider: 'v8',
// An array of file extensions your modules use
moduleFileExtensions: ['js', 'mjs', 'cjs', 'jsx', 'ts', 'tsx', 'json', 'node'],
// A map from regular expressions to module names or to arrays of module names that allow to stub out resources with a single module
moduleNameMapper: {
'^@/(.*)$': '<rootDir>/$1',
},
// The test environment that will be used for testing
testEnvironment: 'jest-environment-node',
// The glob patterns Jest uses to detect test files
testMatch: [
'<rootDir>/**/*.test.(js|jsx|ts|tsx)',
'<rootDir>/(tests/unit/**/*.spec.(js|jsx|ts|tsx)|**/__tests__/*.(js|jsx|ts|tsx))',
],
// An array of regexp pattern strings that are matched against all source file paths, matched files will skip transformation
transformIgnorePatterns: ['<rootDir>/node_modules/'],
};
JavaScript
복사
3.
테스트 파일 작성하기
다음과 같이 샘플 테스트 파일을 작성하였습니다. .test. 가 포함되도록 파일을 생성하였습니다.
// tests/sum.test.ts
import {sum} from './sum';
describe('sum module', () => {
test('adds 1 + 2 to equal 3', () => {
expect(sum(1, 2)).toBe(3);
});
});
JavaScript
복사
4.
테스트 실행하기
yarn test
### npm
npm run test
Bash
복사


